Finally… A Studio of My Own
(and how it may have saved my life)
April 7, 2016
 WOW!! I now have my very own art studio! It was actually my wife Lu that planted the seed for a studio… but the idea had to lay dormant until space in our home became available. There is a four room, in-law apartment attached to our home which housed my parents for many years… and later my step-son. He moved out in January 2016… and suddenly there was space available. The seed was germinated, and so it began…
But first, let me set the stage and explain what I was faced with each time I wanted to paint. My studio, as it were, was in the laundry room in our basement. My equipment and art supplies for the most part had to be stored in other locations around our home. To set up a painting session I first had to dash around gathering materials… paints, easel, palette, cleaning equipment, brushes, canvas… well, you get the idea.
Next, I had to cover our chest freezer with plastic so that I had a place for my palette. Then I had to put plywood over the laundry tub, and cover the washer and dryer with plastic to have a place for my brushes, tubes of paint, and other tools including a brush cleaning station. My easel was then placed on the laundry-folding table. YIKES!!! Are you serious? Yep… had to cover that rascal with a shower curtain and brown paper to protect it from the oil paints and odorless mineral spirits. Can you imagine how long I would have lived if I had left any trace of paint on that table and Lu or I folded clean laundry that suddenly developed colorful paint splotches? Taking my life in my hands I was… (can you see why a new studio may have saved my life?).
So after maybe half an hour or so of preparation I was ready to begin painting. My wet-on-wet style paintings can take anywhere from two to eight hours to complete… standing on a cold cement floor at a laundry table. Tired I was when one of my ‘masterpieces’ was finished … but then I had to spend another 45 minutes or more cleaning up, storing everything, and making sure all was in pristine condition so life could go on in the laundry room (and so I would be able to live to see another day). Whew!!! I’m exhausted just remembering how tedious all that was.
All that has changed. New paint, new flooring, a new window, and new lighting in one of the recently abandoned rooms of the in-law apartment set the stage for my new studio. I began my search for items that would suit my artist’s needs, and with the help of Lu decisions were quickly (but carefully) made.
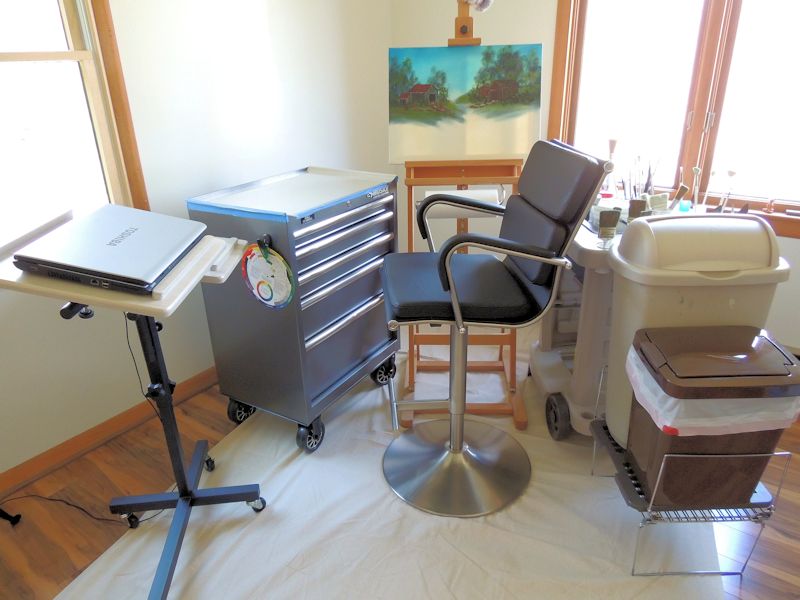
I adapted a roll-around garden station to use as my brush holder and cleaning station (found it on Amazon…). It 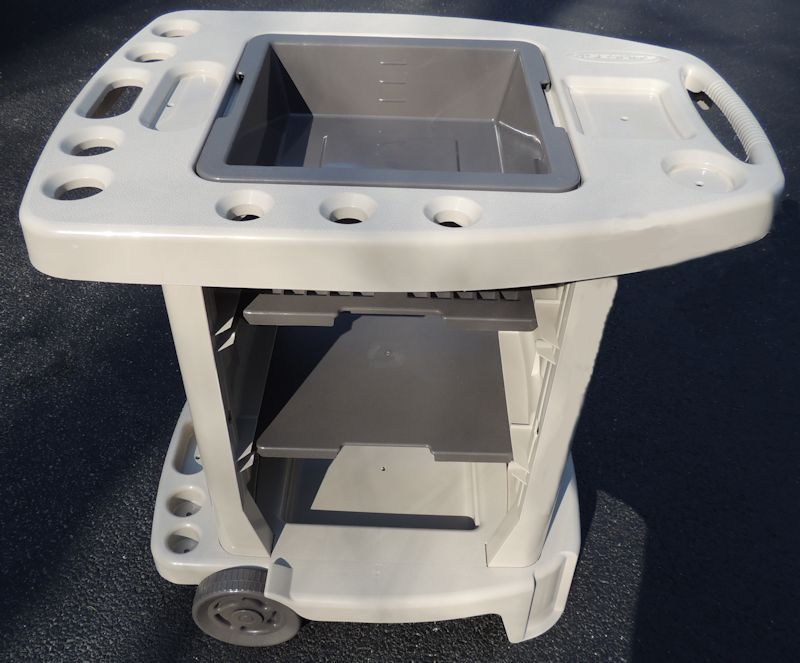 has a deep, removable pan which is perfect for my little bucket of brush cleaner. (A bonus is that it also safely contains any splashes as I initially clean bushes.) The pan also has room for a few brush holders and a small container of hand wipes. It is easy to clean but if paint gets on the cart anywhere, no big deal.
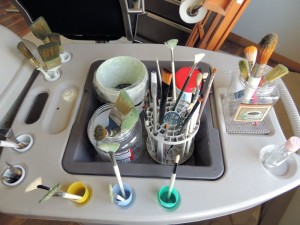 I used PVC pipe with caps on the bottom in the larger holes (originally intended for long-handled garden tools) to hold brushes and pallet knives. I used some colorful flexible plastic that I rolled up to fit in the smaller holes to hold more brushes.
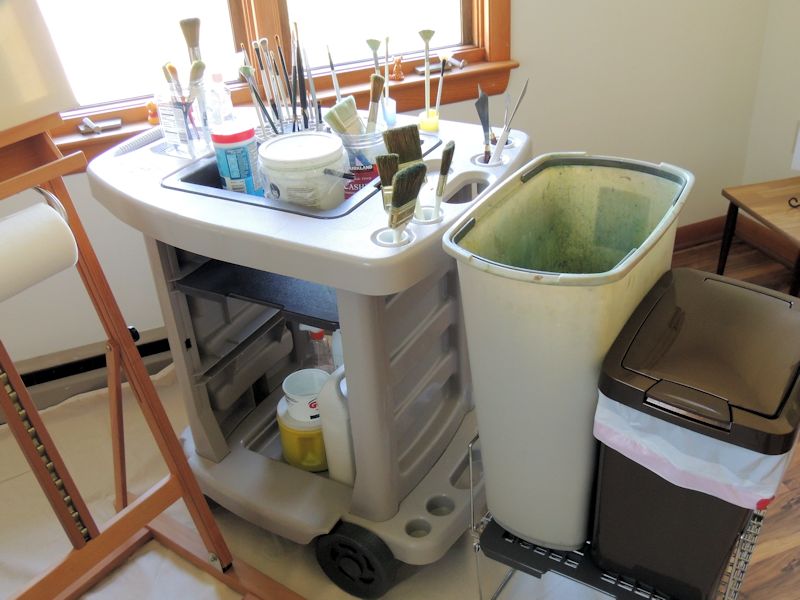 There are also two removable shelves and a bottom shelf that holds my larger containers of mineral spirits and other items. Next to the cart I have a stand that I use for holding a tall trash can that holds my brush beater (a fun but somewhat messy exercise best completed in a well contained area), as well as a smaller trash can for paper towels used to clean and dry brushes
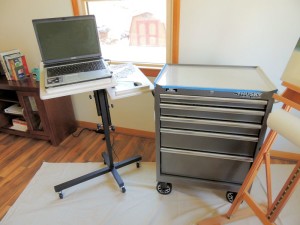 I use a Husky 5-drawer tool box (Lu’s rather brilliant suggestion) for storing paint, gessos, extra brushes & pallet knives, etc. The top of tool box was a near-perfect fit for my clear acrylic pallet. I use white freezer paper under the palate so I can properly mix colors. The paper rarely has to be replaced since the pallet fits so well. As you can see in the photo, there is a very handy laptop stand close by so I can view inspirational pictures or helpful videos.
The studio also has a TV console that I use for storage o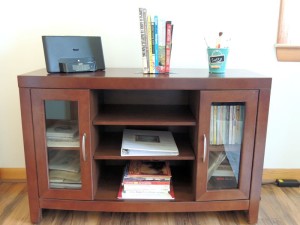 f instructional DVD and VHS videos, how to books, record keeping, and it also holds my radio-CD-iPad station (pictured). I recently exchanged that unit for a combination unit (not pictured) that will also play my 1960s vintage vinyls. Now I can ‘Twist and Shout’ or sing along with the Beatles as I groove in my world of color.
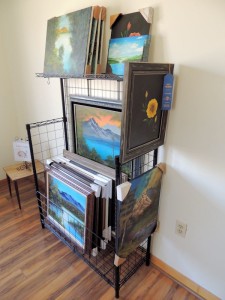 I adapted a portable/collapsible sports equipment storage display to hold my paintings while they dry… as well as some of my finished paintings. I have since added a five shelf version beside the one pictured for additional storage.
There are two windows in the studio… one facing NW, the other SW… not ideal of course… but still not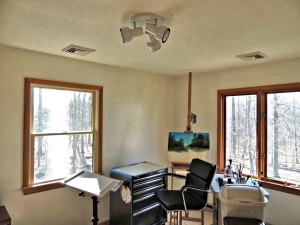 bad. I can supplement the natural light or paint at night using dimmable, ceiling-mounted lights that allow positioning of each fixture independently. I’m using daylight LEDs (light appearance: 5000K) and they work great! The view of the forest and landscape outside the windows provides some relief for my eyes if they begin to feel strained.
Two clothes closets hold my new canvases, frames, framing materials, and other needed items with space left over for additional storage of finished works. There is also a bathroom for those urgently needed quick trips between brush strokes; very handy for an aging artist.
Below is an overall view of my painting area. I use an adjustable height swivel chair with a foot rest so I can just rotate to my brushes, cleaning station, pallet, or laptop… and back to the easel. If I feel frisky, I can just move the chair out of the way and dance with some music as I paint. I placed a painter’s canvas drop cloth on the new laminate flooring even though this particular flooring is pretty much artist proof. Better safe than sorry. As you can see, everything is either on wheels or easily moveable so I can reposition myself to get better lighting if needed.
I’m trying not to overload the studio… I want to be able to focus on my work… not on decorative items. Also, visitors will not be distracted by superfluous items that take their attention away from the artwork on display. My goal was to have a dedicated, comfortable, and practical studio that I wanted to be in… and looked forward to being in… and not have to worry about cleaning everything up and storing things each time I painted. Now I can clean my brushes and pallet, keep the art on the easel to dry, and walk away until the next time… what’s not to love about that?
Sutty
NOTE: Lu also has a new studio in another room in the in-law apartment. It is a well-thought-out endeavor… very functional and well appointed. Now she too has a dedicated space for her artwork and jewelry making pursuits. Perhaps she will write a blog at some point and post some pictures.
[As always, helpful suggestions and/or comments are always welcome. If you would like more detailed information about how I set things up just let me know. Please feel free to use the reply window below or for a private email message you may use our contact page.]
So glad you finally have a great space to work in! Bet your mom and dad are beaming down from Heaven at the good use you have made of the space!
Thanks Judi… I feel sure you are right. 🙂
Very very nice. I love it!!
Thanks JoAnn… 🙂